Carl’s Place DIY Golf Simulator Enclosure (C-Series)
US$ 999.95
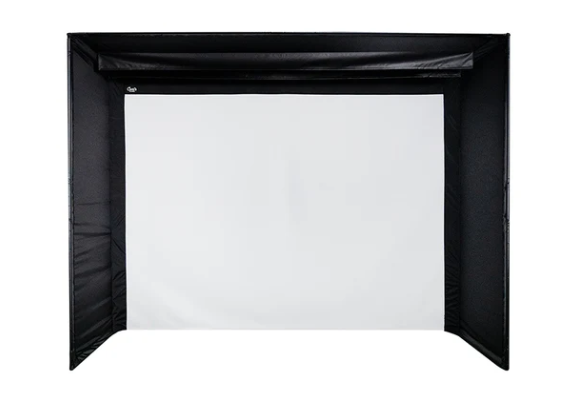
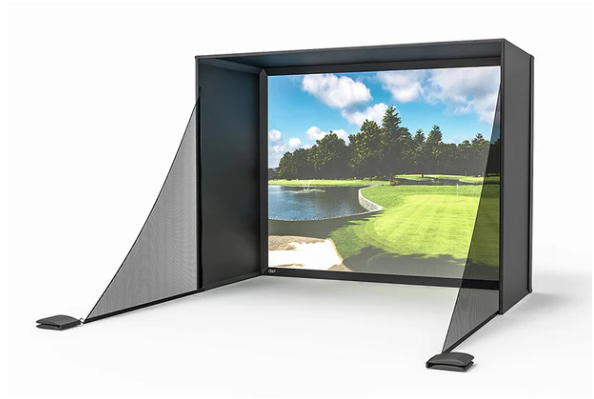
Carl’s Place DIY Golf Simulator Enclosure (C-Series) is built for golfers who want a proper hitting bay at home without paying for a custom build. It turns a spare room, basement, or garage into a dedicated simulator space with a full-size impact screen and a blackout enclosure. You assemble it yourself with a straightforward frame-and-fabric design, resulting in a clean, finished look that doesn’t feel like a tarp hung in the corner.
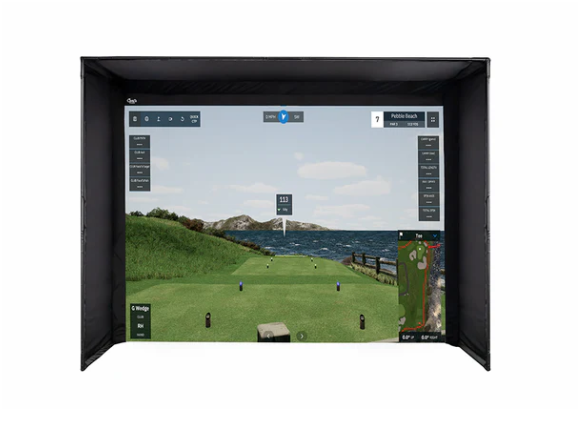
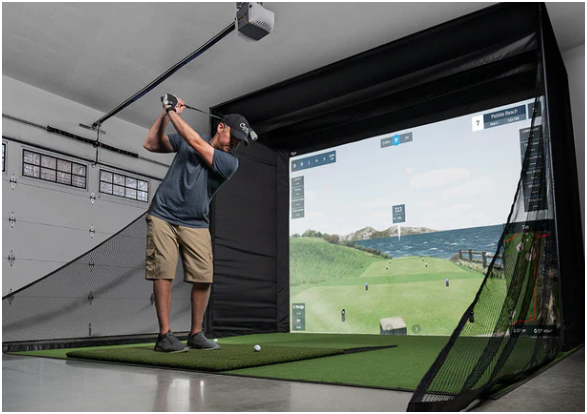
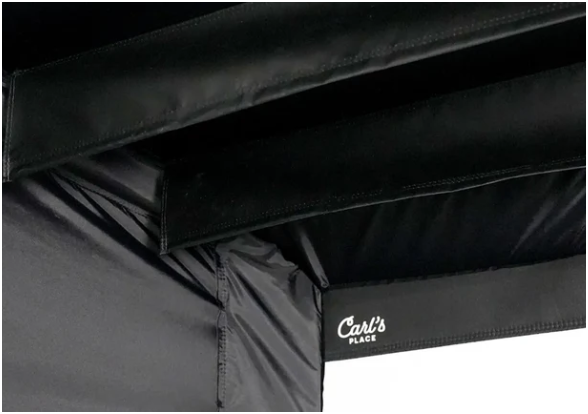
This enclosure focuses on one thing first: safety in a real swing space. The black nylon enclosure surrounds the hitting zone and is there to catch the shots that don’t come off the middle, thin wedges, low bullets, toe strikes, the occasional shank when a buddy “just wants to try it.” It also helps manage rebounds when the ball hits the screen. The point is simple: protect the room and keep the bay predictable, so you can make full swings without worrying about what’s behind the screen or beside your stance. The C-Series design also pushes immersion in a way that actually matters when you’re standing over the ball.
It uses a borderless bottom cable design so the projected image runs down toward the turf rather than stopping at a thick bottom border. When you tension the screen correctly, you get the “floor-to-screen” look that makes simulator golf feel less like hitting into a movie screen and more like hitting into a golf environment. Carl’s Place also positions this bottom cable approach as a way to keep bounce-back under control when set up properly.
When you buy this product, you get a kit that stays DIY-friendly from start to finish. Carl’s Place includes the enclosure panels, your chosen impact screen, and the steel fittings that connect the frame. You supply 1-inch EMT (electrical metal tubing), or you can add a pipe framing option that arrives ready to go. Either way, the build is meant to be repeatable: assemble the frame, attach the enclosure, tension the screen, and you’re ready to hit, without inventing your own hardware plan halfway through the project.
This “build it once, use it for years” feel comes from the structure. The kit relies on steel corners and support fittings to join the EMT frame and keep everything square. This matters more than people expect. A stable, consistent frame makes screen tension easier to dial in, keeps the enclosure looking tight instead of saggy, and reduces the little alignment frustrations that can make DIY builds feel messy. You build the frame, attach the panels and tension the screen. Then you stop tinkering and start practicing.
Carl’s Place also gives you choices where they matter most: the screen material. The DIY C-Series enclosure supports four screen options: Standard, Preferred, Premium, and High-Contrast Gray Premium so that you can match the build to your room and expectations. If you’re in a darker space with full light control, a traditional bright screen can look excellent. If you’re in a garage with light leakage, you’ll care more about contrast, black levels, and keeping the image from looking washed out.
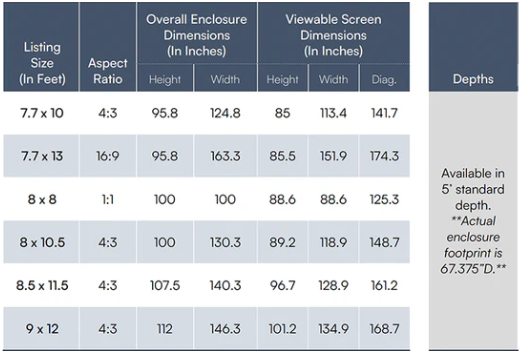
Sizing is another reason this kit works for so many builds. Carl’s Place enclosure lists standard DIY sizes ranging from about 7.7′ x 10′ x 5′ up to 10′ x 15.5′ x 5′, and also promotes sizing “down to the inch” through its customization approach. This flexibility matters in real houses where nothing is perfectly convenient, garage tracks, soffits, beams, pipes, or a room that’s almost right but not quite.
Space planning matters, and Carl’s Place calls out buffer space behind the enclosure so you don’t build yourself into a corner. The guidance is specific: 12 inches at the rear is recommended, and 8.25 inches is the minimum to fit the rear fittings. This prevents one of the most common DIY mistakes, pushing the enclosure tight to the back wall and then fighting the hardware during assembly or dealing with unwanted contact behind the screen.
The enclosure also supports practical “finish work” through add-ons, turning a basic bay into a polished setup. You can choose optional items like frame pipes, foam inserts, safety baffles, net wall extensions, a back cover, and turf. The nice part is that you can stage the build: start with a safe core, then add the pieces that improve comfort, containment, and image quality once you’ve used the bay and know what you want next.
Foam inserts add peace of mind in the spots golfers worry about most: edges and corners. Carl’s Place notes that the kits use tight flaps from the screen to the wall to protect the frame, and foam fills the remaining void behind those flaps. Practically, it reduces the odds of the rare “perfectly wrong” ball finding a gap, and it also makes the bay look and feel more solid when you’re standing over the ball.
Safety baffles help control high-angle rebounds. They mount overhead and are there for the shots that hit high on the screen and want to climb, wedges, flop-style practice, or a player who adds loft and spin indoors. In a shared simulator space, baffles are also a smart move because not everyone launches the ball the same way, and you want the bay to handle different swings without drama.
A back cover kit helps you control light and tighten up the look. It reduces light leakage behind the screen so the projected image reads cleaner. It also closes off the rear of the structure, which matters if the simulator is in a visible part of the home or you want the space to look intentionally finished rather than like a frame sitting in the middle of a room. Carl’s Place also notes you can add pipes for the back cover or source them yourself.
Once you build the enclosure, it becomes the anchor for the rest of your simulator. Add the launch monitor that matches your goals. Mount a projector and set your throw distance and aspect ratio. Choose turf that supports your stance and strike without beating up your wrists. The enclosure is what makes all those pieces behave like a single system, rather than a pile of equipment that works only when everything lines up.
This is also a product built around repeatable success: clear instructions, known materials, and a structure that’s meant to go together cleanly. Top Shelf Golf positions it as a “tour-quality bay” you can build yourself, with the screen, enclosure, and steel fittings included, plus the option to customize sizing. The result is a bay you’ll actually use because it looks good, feels safe, and doesn’t require constant adjustment.
Product Details:
- DIY enclosure kit designed for indoor golf simulator bays
- Borderless bottom cable screen design for floor-to-turf visuals
- Black nylon enclosure panels to catch mishits and boost projector contrast
- Steel corner and support fittings for the EMT frame
- Includes ball bungees, zip ties, and extras for setup and tension tuning
- Includes assembly guide and EMT pipe cut list
- Requires 1-inch EMT unless you add the optional pipe framing kit
- 1-inch EMT trade size; true outer diameter listed as 1.163″ (27 mm)
- Screen materials: Standard, Preferred, Premium, High-Contrast Grey Premium
- Standard size range listed from 7.7′ x 10′ x 5′ to 10′ x 15.5′ x 5′
- Rear buffer guidance: 12″ recommended; 8.25″ minimum for rear fittings
- Optional add-ons: frame pipes, foam inserts, safety baffles, net extensions, back cover, turf
Product Features:
- Creates a true golf “bay” in a room or garage
- Delivers immersive, floor-to-screen visuals with a borderless bottom
- Let’s you choose screen performance from Standard to Premium tiers
- Improves projector contrast with a blackout nylon enclosure
- Catches mishits to protect walls and keep practice stress-free
- Uses steel fittings to simplify a strong EMT frame build
- Includes fasteners and extras so you can dial in screen tension
- Supports custom sizing so the enclosure fits tightly in unusual spaces
- Adds safety and polish with foam, baffles, nets, and back cover options
- Helps you build a complete simulator experience around your launch monitor